How to make a load testing plan
September 21, 2021
Load testing gives insight into a web application’s behavior under peak load conditions and realistic load conditions. By load testing your web application you will identify the maximum capacity the web application can handle as well as any bottlenecks and determine which element is causing degradation.
This article will help you make a plan of approach for load testing your web application.
What is the desired outcome of the load test?
By load testing your web application you get lots of useful information about its behavior under all kinds of load conditions. But if you don’t think about what outcome you want in advance, there’s a good chance that you’re missing just that piece of crucial information. Think about what you want to get out of the load test; what questions should the load test answer?
These are typical questions a load test could answer;
- What element is the bottleneck when the load on the web application increases?
- Does the web application scale correctly when the load increases?
- Is the web application responding promptly when it’s tested under realistic load conditions?
- How many concurrent users can the web application handle while tested under peak load conditions?
- How does the response time relate to the number of concurrent users?
- What optimizations are possible to improve the performance and capacity of the web application?
How are we load testing the web application?
With a load testing suite, you can create different test scenarios. A test scenario consists of the steps the load test should take and the number of concurrent users (also called threads or virtual users) that should start sending traffic to your application.
You also define a ramp up and ramp down speed. The ramp-up speed is the speed at which new concurrent users are added and start sending traffic to the web application. The ramp-down speed is the speed at which users stop sending traffic to end the load test.
We will test the web application under two different load conditions;
1. Testing under realistic load conditions
When releasing a web application to the public you want to be as sure as possible that it can handle the traffic you expect it to receive. To do that, you need to make an analysis of user patterns and application usage and create test scenarios that mimic real users.
2. Testing under peak load conditions
For testing under peak load conditions you use the same scenarios as for the realistic load conditions, but with different parameters. The number of concurrent users should be increased above realistic numbers until the web application stops responding. This will identify the maximum capacity of the web application.
Gathering input for the test scenarios
The test scenarios require input to make them mimic the real user patterns and behavior. These are the most important questions that you need to answer;
What is a realistic number of concurrent users?
If the web application you want to load test is replacing an existing web application then you’re in luck. You can use historical analytics to roughly calculate a realistic number of concurrent users.
- Go to the ‘sessions’ or ‘users’ view in your analytics application.
- Find the busiest day in the past year.
- Within that day, find the busiest 2 hours.
- Use the following formula to calculate the concurrent users;
sessions or users of 2 hours * average amount of time spent on a page in seconds / 3600 seconds / 2 hours = concurrent users
This gives an estimate of the concurrent users on the busiest day you had last year which could be your goal for the realistic load conditions.
In our example, we have 20000 sessions and an average time spent on a page of 2 minutes, which results in roughly 333 concurrent users.
| Total sessions in 2 hours | 20000 sessions |
| Average time spent on page | 120 seconds |
| Concurrent users | 333 concurrent users |
What parts of the web applications will be used most by your users?
It’s important to balance the load over the different parts of the web application based on a realistic estimate. If for example, the homepage is likely to be hit with the most traffic, then the load testing suite should also send the most traffic to the homepage. When you have historical analytics you can use that as a source (In Google Analytics this is called ‘Content Drilldown’).
Your analysis should result in list like this;
| Path | Percentage of traffic to receive |
|---|---|
| / | 60% |
| /articles | 20% |
| /shop | 15% |
| /contact | 5% |
When is a response successful?
To know when the web application is failing to respond to request’s from the load test you need to define a few boundaries;
- How long may the web application take to respond to a request?
- What result is considered a successful response?
| Maximum response time | 30 seconds |
| Successful response | HTTP 200, 201, 301, 302, 308 |
These boundaries need to be enforced in the load testing suite.
Creating test scenarios
With all the input gathered we can create the test scenarios. The load testing suite should be configured with these scenarios and output its results per scenario. That makes it easy to analyze and compare the result afterward.
In the example below, we have 3 realistic test scenarios and 3 peak conditions test scenarios. The peak conditions test scenarios increase the concurrent users above the realistic scenarios and have a shorter ramp-up speed to put more stress on the web application.
There’s also a ‘zero measurement’ scenario with only 1 concurrent user. This generates a baseline and gives insight into the response times without load. You can use this baseline to compare with results from the application under heavy load to measure the relative impact on the response times.
| Test scenario | Concurrent users | Ramp up time | Duration |
|---|---|---|---|
| Zero measurement | 1 | 0 minutes | 5 minutes |
| Realistic conditions 1 | 100 | 5 minutes | 20 minutes |
| Realistic conditions 2 | 200 | 10 minutes | 30 minutes |
| Realistic conditions 3 | 350 | 20 minutes | 60 minutes |
| Peak conditions 1 | 300 | 10 minutes | 30 minutes |
| Peak conditions 2 | 400 | 15 minutes | 40 minutes |
| Peak conditions 3 | 600 | 20 minutes | 50 minutes |
Executing the load test
When you’ve transformed the plan of approach in load testing scripts it’s time to execute it.
A few tips when running the load testing suite;
- Run the load testing suite on a server with enough (network) capacity to generate the peak load on the web applications.
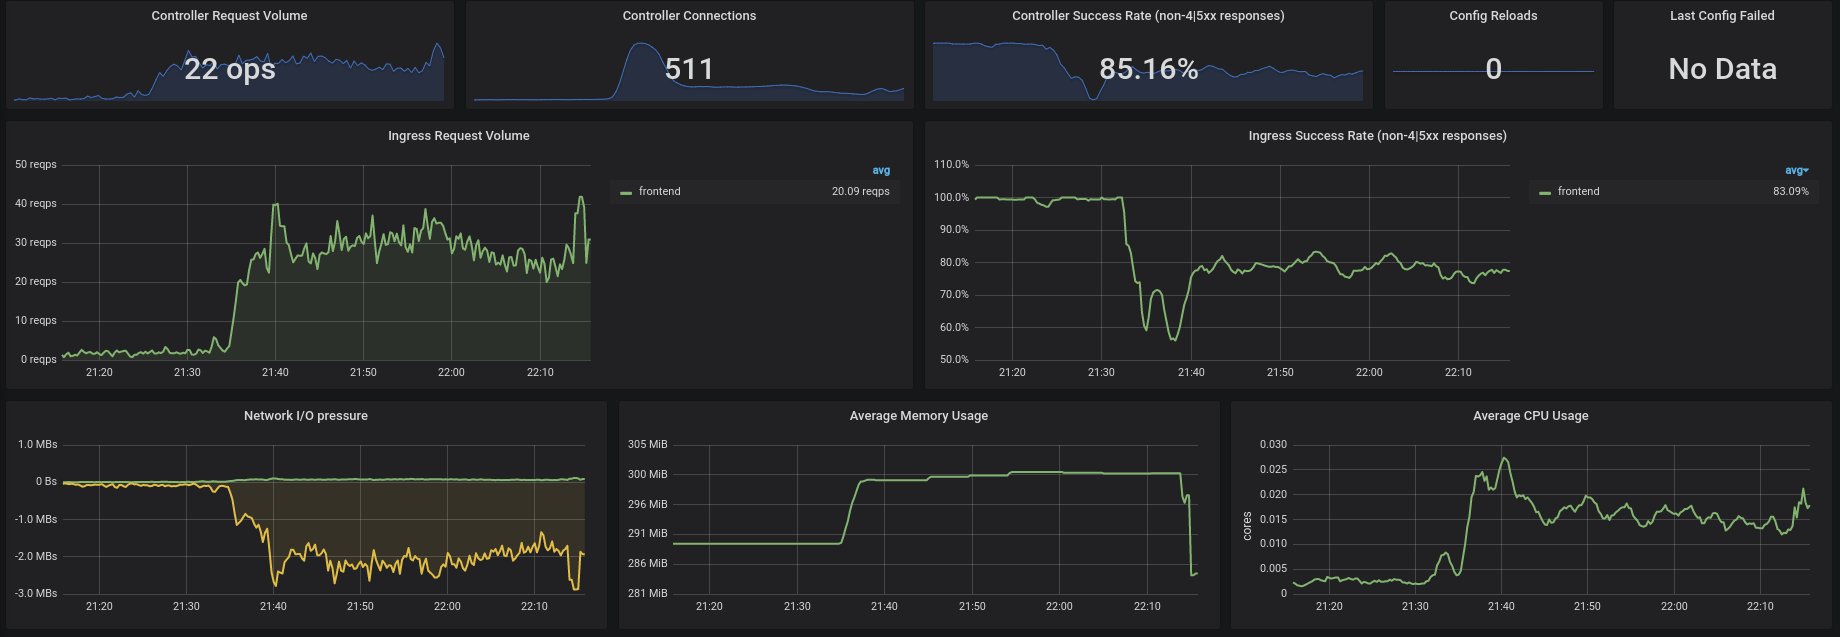
- Have monitoring in place that can show you (near-) real-time what the load does with the resources and how traffic is flowing through your web application and underlying systems.
- Test the web application on the production environment or environment with similar resources.
- Do the load testing together with other developers to have an extra pair of eyes when the application shows unexpected behavior.
The result
When you’ve finished the load test it’s important to capture your findings. Make sure to store the (raw) results, screenshots of monitoring, backtraces of unexpected errors, etc. Storing it in your version control system (together with the load testing scripts) could be a good place. This is important because in most environments it takes quite some planning and communication to execute a load test, so you want to avoid having to redo it because you’re missing a crucial piece of information.
You should also write a conclusion by answering the questions you wrote down in the plan of approach. Together with the findings, you have a nice report that captured the current state of your web application’s capacity.
Go back